Hey — I’m Kova Tech. If you’ve picked up the Razer Viper V2 Pro (or you’re thinking about it), this guide will walk you through Razer Synapse and how to get the absolute most out of the mouse. I’ll cover everything from profiles and button remapping to DPI tuning, Hypershift, inter-device combos, calibration, and power settings. Consider this your one-stop walkthrough for the Synapse software settings that matter for both competitive play and everyday use.
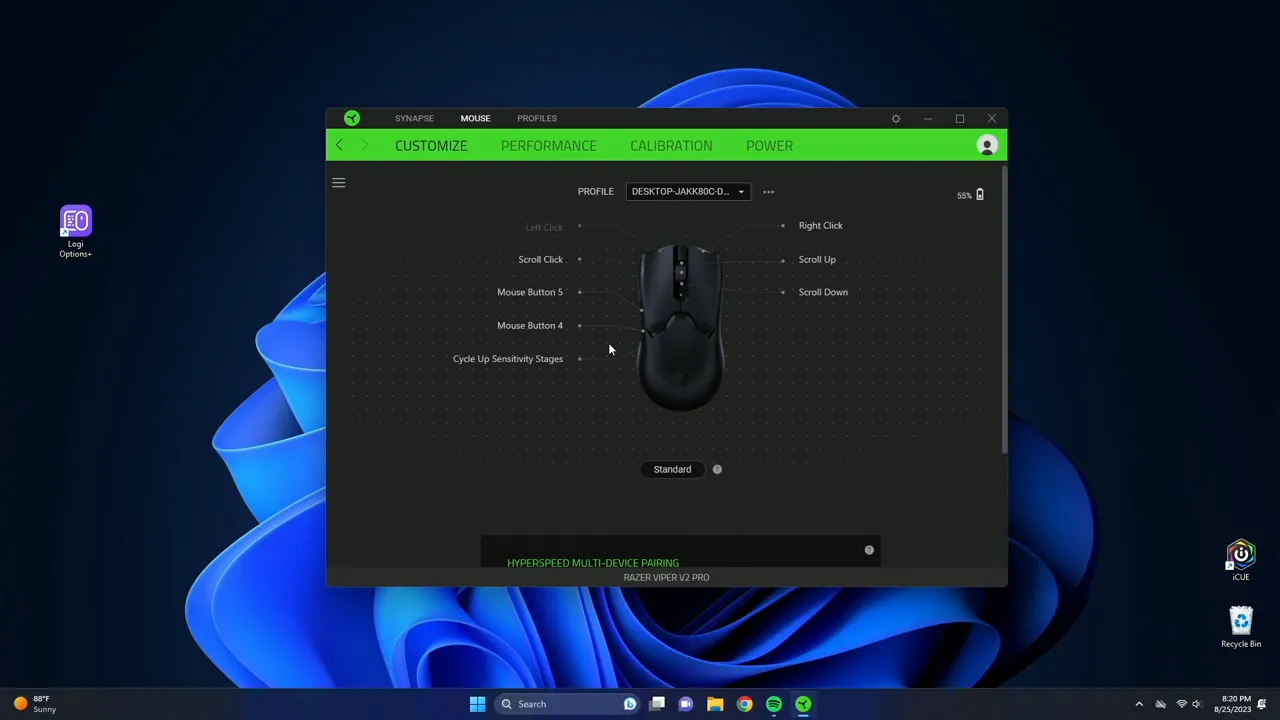
Table of Contents
- Article outline
- Profiles & Game Linking
- Button Mapping: Keyboard, Mouse, Turbo, and More
- Inter-device Commands & Hypershift
- Performance Tab: DPI, Polling Rate, and Profiles
- Calibration & Power Management
- Practical Tips, Recommended Settings, and Troubleshooting
- FAQ
- Conclusion
Article outline
- Profiles & Game Linking
- Button Mapping: Keyboard, Mouse, Turbo, and More
- Inter-device Commands & Hypershift
- Performance Tab: DPI, Polling Rate, and Profiles
- Calibration & Power Management
- Practical Tips, Recommended Settings, and Troubleshooting
- FAQ
- Conclusion
Profiles & Game Linking
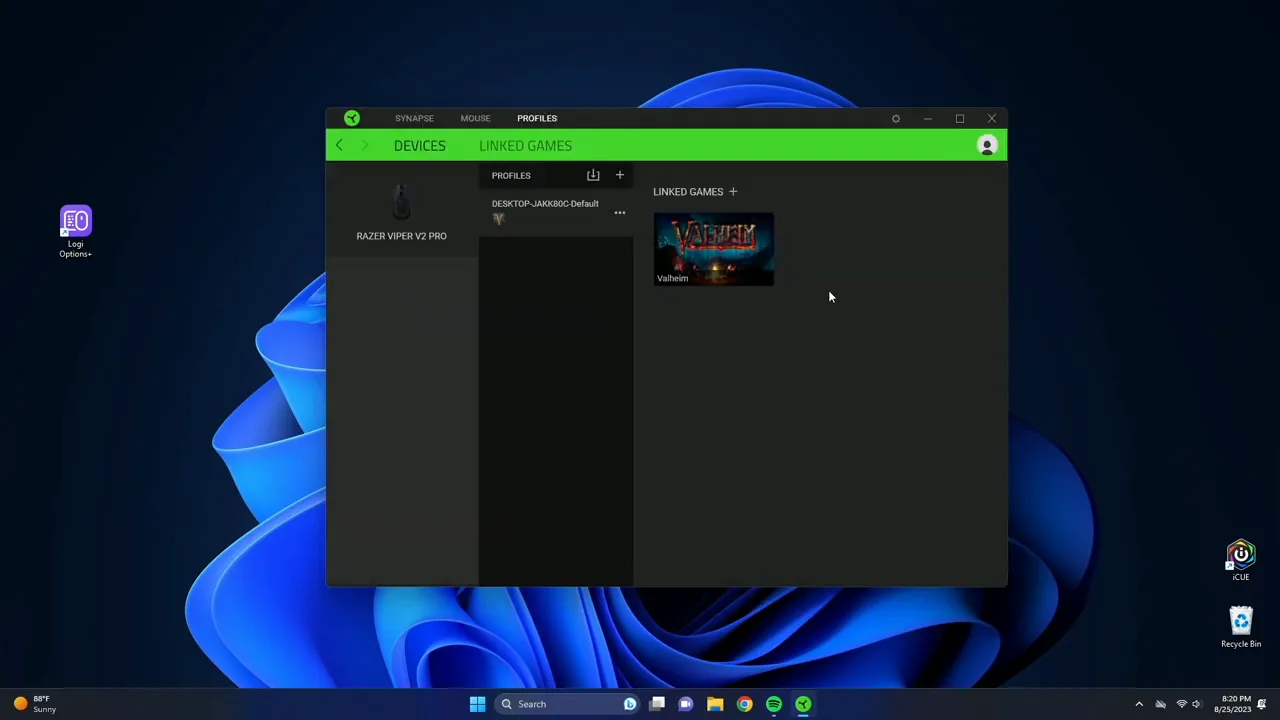
Synapse opens up with a profile-centric workflow. Profiles are your best friend — create a new one for each game or workflow (streaming, editing, general use). Click the "Add" button to create a profile, and then use the small plus icon to trigger that profile automatically when a specific game launches.
For instance, if you play Valheim a lot, link a Valheim profile and it will switch automatically when the game starts. That means your keybinds, DPI stages, Hypershift layer, and macros can all change instantly based on the application in focus. It’s a huge time saver and keeps your setup clean.
Button Mapping: Keyboard, Mouse, Turbo, and More
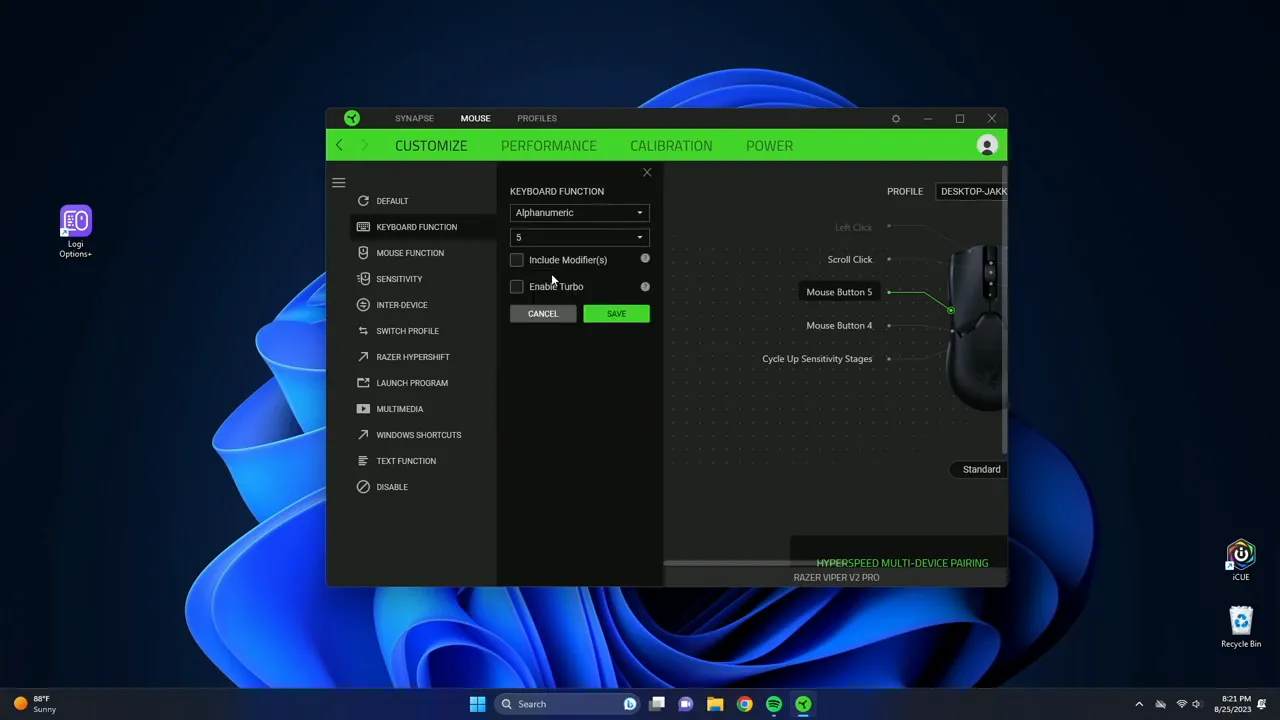
Every button on the Viper V2 Pro is remappable. Click any button icon in Synapse to assign a function. The big categories you’ll use are:
- Keyboard function: Map any keyboard key to a mouse button. Want your front side button to register “5”? Assign it and hit save.
- Mouse functions: Default mouse actions (middle click, wheel tilt, etc.).
- Turbo mode: Set a button to rapidly repeat a keystroke — configurable from a few repeats up to 20. Useful for rapid-fire actions, but use responsibly (some games may detect macro-like behavior).
- Launch program / URL: Open an app or a website with a single click.
- Multimedia: Volume, play/pause, next/previous track — handy for streaming or music control.
- Windows shortcuts & utilities: Quick access to Snipping Tool, Paint, copy/paste, etc.
- Text function & symbols: Store text snippets that paste on press — includes an emoji menu and symbol chooser.
- Disable button: If you consistently hit a button by accident, disable it.
Two tips when mapping buttons:
- Use modifiers (Shift, Ctrl, Alt) when you need compound commands without using macros.
- Keep a dedicated macro or turbo only for non-competitive situations to avoid breaking game rules and to keep predictable behavior.
Inter-device Commands & Hypershift
Razer Synapse can combine inputs across Razer devices. That means you can create combos like Shift (from your keyboard) + Mouse Click (from your mouse) to trigger a single action. This is super useful for complex workflows — think video editing shortcuts or productivity macros — and is typically impossible across non-Razer devices without extra software.
Hypershift is one of my favorite Synapse features. Hypershift effectively doubles the number of functions available by letting you assign a secondary layer to every button. Enter Hypershift mode and all buttons perform their alternate functions; exit Hypershift and you return to standard mode.
Assigning Hypershift is simple: select the button you want to toggle Hypershift with and choose the Hypershift assignment. You can then map a whole new set of commands to every button while Hypershift is active. For example, use Hypershift as a “tactical” layer for grenade throws, voice commands, or utility macros in-game.
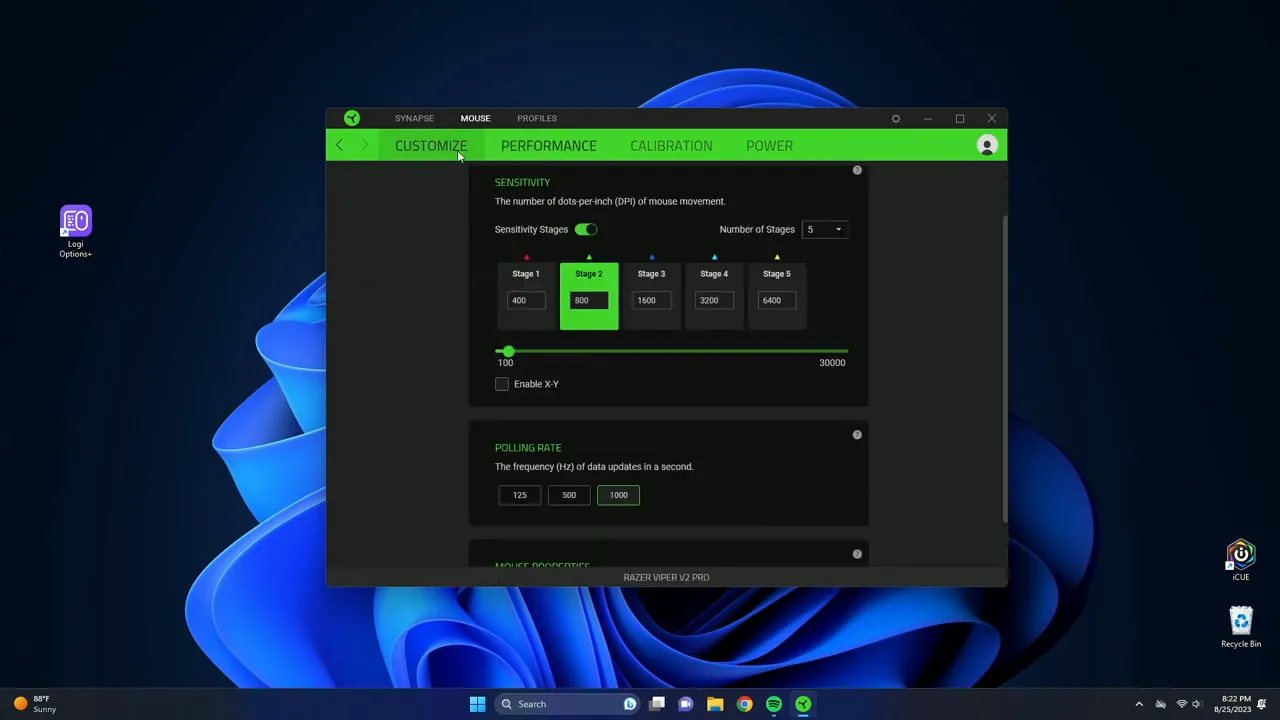
Performance Tab: DPI, Polling Rate, and Profiles
The Performance tab is where you tune the Viper V2 Pro to match your playstyle. Key settings include DPI stages, X/Y split, polling rate, and which DPI stages are accessible when cycling on the mouse.

Important points:
- DPI stages: Drag the sliders or type DPI values directly into the boxes. You can set multiple stages — useful for switching from sniping precision to tracking speed on the fly.
- X/Y DPI: Enable separate X and Y DPI to fine-tune horizontal vs vertical sensitivity. This is niche but useful for players who want asymmetric sensitivity (e.g., for certain flight sims or top-down games).
- Profile cycling: Press the DPI button on the bottom of the mouse to cycle DPI stages. If you don’t want to cycle through five stages during play, reduce the number of active stages to two for faster switching.
- Polling rate: This governs how often the mouse reports to the PC. With Razer HyperSpeed Wireless, I recommend keeping it at 1000 Hz to minimize input lag and avoid skips. Lowering it saves negligible battery but increases latency.
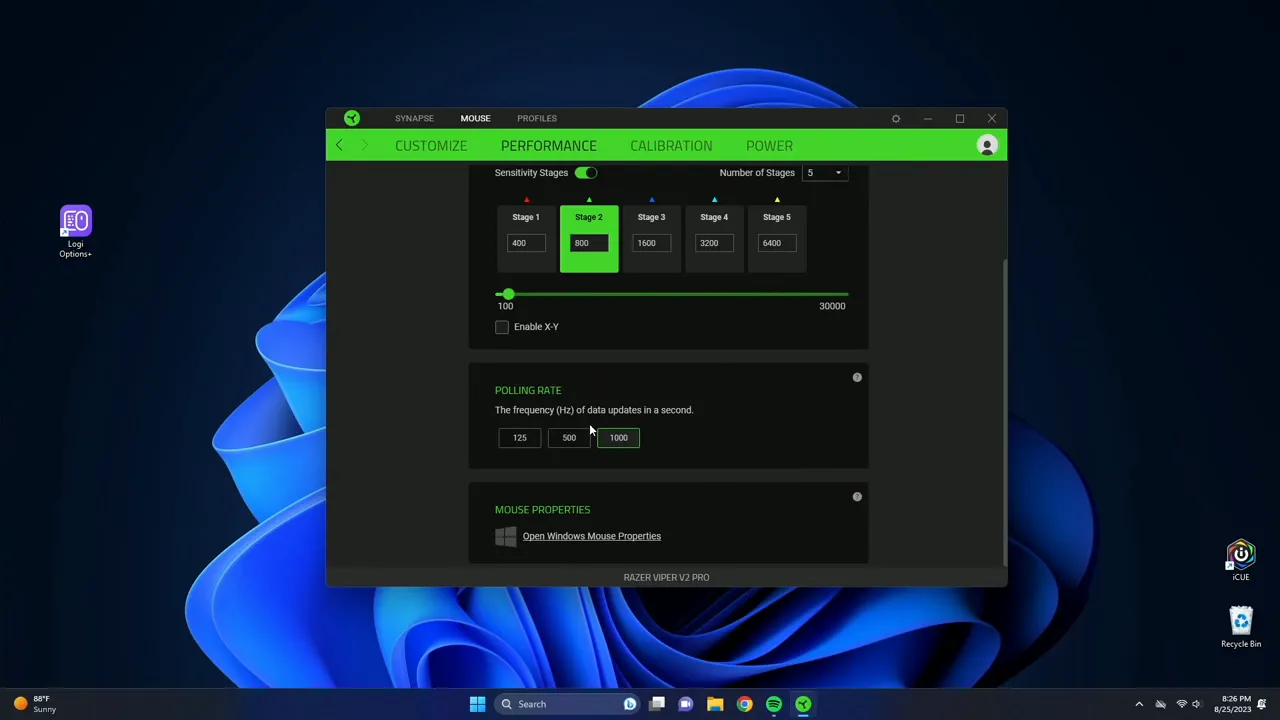
Set your DPI stages with intention: pick a low DPI for precise aiming and a higher DPI for fast turns. Most esports players pick something between 400–1600 DPI, paired with in-game sensitivity tuned to their preference. Test in-game and adjust until your flicks feel natural.
Calibration & Power Management
Calibration and power settings are essential to reliable tracking and battery life:
- Surface calibration: This adjusts tracking distance (lift-off distance) and optimizes sensor behavior for your mousepad or desk surface. Calibrate to the surface you use most to reduce jitter and improve consistency.
- Lift-off distance: Lower values mean the sensor stops tracking sooner when you lift the mouse, helpful for low-sensitivity players who frequently reposition the mouse. Higher values allow you to lift without losing tracking as quickly.
- Power mode: Synapse can idle the mouse after a set time (e.g., five minutes) to save battery. Keep it enabled to extend battery life.
- Low power mode: When your battery drops below a threshold (default often 30%), the mouse can throttle performance to preserve battery. I recommend lowering that threshold — I personally set it to around 5% so the mouse doesn’t drop into reduced performance prematurely and risk sudden changes during gameplay.

Minor note: lowering the low-power threshold gives you more usable battery time at full performance but be mindful to recharge before you run out. The Viper V2 Pro’s battery is generally solid, so a conservative 5% cutoff works well for most users.
Practical Tips, Recommended Settings, and Troubleshooting
After spending time with the Viper V2 Pro in Synapse, here are practical recommendations I use and suggest to others:
- Keep polling at 1000 Hz: With HyperSpeed Wireless, you get the low-latency benefits of wired mice while retaining wireless convenience.
- Use 2 DPI stages if you prefer quick cycling: Configure one low DPI for precision shots and one higher DPI for fast movement — toggle between them through the bottom DPI button or a bound key.
- Lower your low-power cutoff to ~5%: Prevents unexpected throttling during matches.
- Calibrate to your mousepad: Surface calibration reduces lift-off inconsistencies and improves tracking accuracy — do it once and forget it.
- Reserve turbo/macros for casual play: Some games detect or disallow repeated inputs; using macros in competitive environments can get you flagged.
- Use Hypershift for secondary tool layers: Instead of cluttering your main bindings, map utilities or complex commands to Hypershift so they’re always accessible but out of the way.
- Combine devices for workflow shortcuts: If you own a Razer keyboard, create productivity combos (Shift+Click macros) to speed up repetitive tasks.
FAQ
How do I make Synapse switch profiles automatically when I open a game?
Create a profile, click the plus icon to link it to a specific program, and point it to the game’s executable. Synapse will automatically switch profiles when that game launches.
What DPI should I use for competitive FPS?
There’s no one-size-fits-all. Many pro players use 400–800 DPI with a low in-game sensitivity. Pick a DPI where your wrist or arm movement produces precise, controllable aim, then fine-tune in-game until flicks feel natural.
Is 1000 Hz polling rate necessary?
1000 Hz gives you the lowest input latency and is recommended for competitive play. With HyperSpeed Wireless, keeping polling at 1000 Hz is usually the best balance of performance and battery usage.
What is Hypershift and how can I use it?
Hypershift is a secondary layer for button assignments. Assign a Hypershift toggle key and then map alternate functions to every button. Press the Hypershift key to temporarily access the alternate layer.
Should I enable separate X and Y DPI?
Only enable X/Y DPI if you have a specific need (e.g., certain game types or precise vertical/horizontal tuning). Most users are fine with a single DPI value for both axes.
Conclusion
The Synapse software unlocks the full potential of the Razer Viper V2 Pro. Between game-linked profiles, flexible button mapping, Hypershift layering, and deep performance tuning (DPI stages, polling rate, calibration), the mouse becomes an extremely adaptable tool for both gamers and power users. My personal recommendations: keep polling at 1000 Hz, limit active DPI stages for easier cycling, calibrate to your surface, and set a low-power warning around 5% so performance remains consistent during sessions.
There’s a lot you can do with Synapse, and once you spend a bit of time customizing profiles and Hypershift layers, the Viper V2 Pro feels uniquely tuned to your playstyle. If you want to dive deeper into the hardware side (weight, switches, sensor performance), I covered that in a dedicated hardware review you might find useful.
Thanks for reading — see you in the next breakdown. Peace.


